How to create a Document Flow
Get rid of repetitive steps when creating signature requests for your customers, clients and leads. Easily automate your workflow by setting up Document Flows. Pre-define parameters for your signing invitations such as recipient emails and the signing order, and add a description for your sending. Just select the desired Document Flow for your signNow buttons. Signing invitations will be sent in just a few clicks using pre-set parameters.
- To create a Document Flow, select Document Flow in the main menu. Then, select Create New.

- On the Document Flow Settings page, enter a name for your Document Flow.

- Selecting Show tag builder allows for a tag to be created.
Specify the Salesforce record type and Salesforce record field which the data will be used from.
Once specified, the Salesforce tag will be automatically created ({Opportunity.Name} in the example).
Copy the formed tag and insert it wherever needed in the signing invite (only available for document name and signer’s email ).

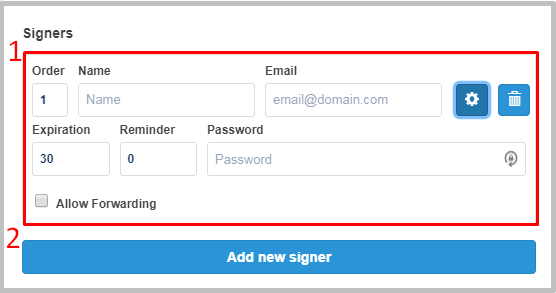
- In the Signers section, select Add new signer to enter recipient names and emails, and define the signing order.
Select the gear icon next to each role to explore Advanced Settings such as setting an expiration date for a signing invitation, a reminder and password.
Check the Allow Forwarding box to let signers forward signing invites to other signers.

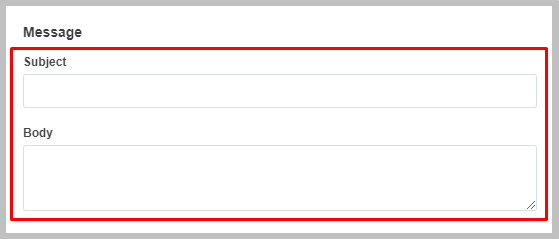
- In the Message section, provide a subject and a brief description of your invite that signers will see once they receive your signature request.

- In the Document name section, enter a name for the document being sent for e-signing.

- In the Salesforce Annotation section, specify your desired line height as well as font size for the text being added to the Salesforce Annotations fields.

- Check the Automatically send box to automatically send your documents using the signNow button in your Salesforce object.
Check the Skip to end box to make documents automatically open on the last step (skipping the document options settings).
Check the Hide Advanced Settings box to hide the advanced settings section when creating your sending.

Once finished, click Save to create your Document Flow.
That’s it! Your Document Flow can now be used for creating signNow buttons using the Button Wizard.
Here you can find an alternative method for creating your Document Flows.
Updated almost 6 years ago
